User Manual
The IDEAL workflow
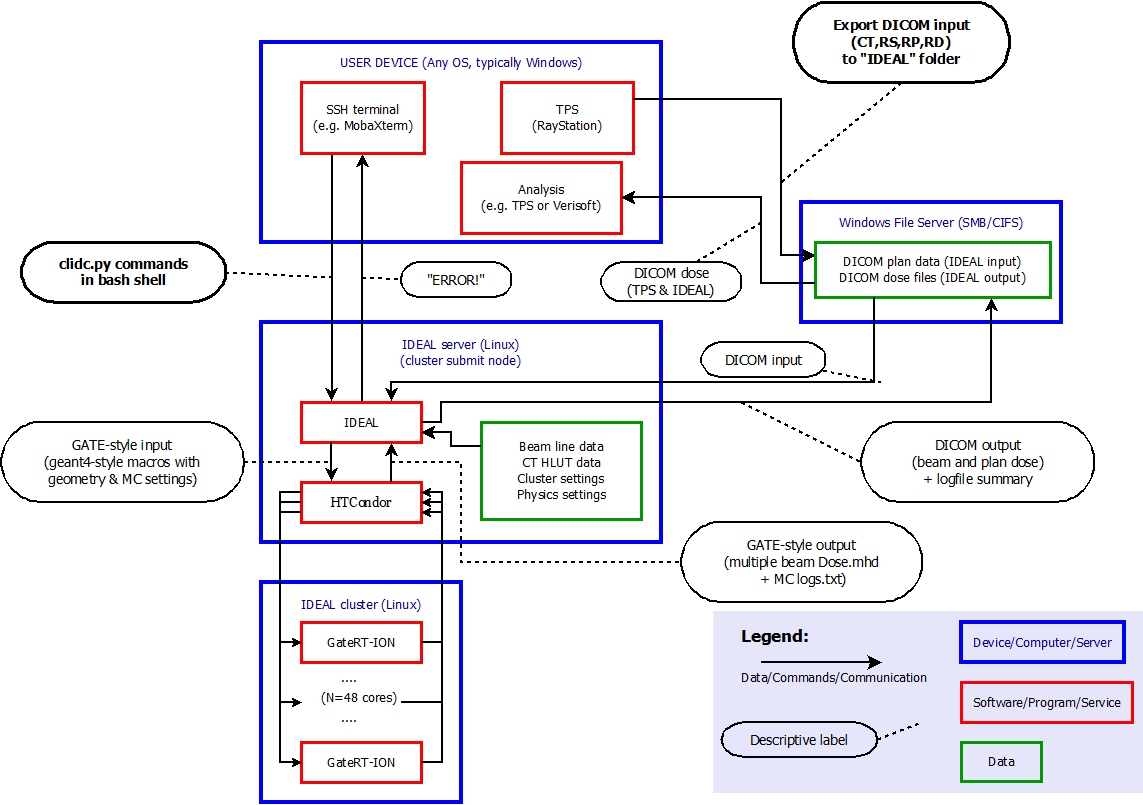
An independent dose calculation with IDEAL
There are different user interfaces for IDEAL, but the basic workflow is always as follows:
User starts user interface with username and role
User provides DICOM input data (CT, RS, RP, RD) * For instance by exporting them from the TPS as DICOM files on a shared file system.
User chooses MC settings:
required: statistical goal (number of primaries, uncertainty, time out, or a combination of these)
optional: CT protocol [1] (required if CT protocol is not automatically recognized).
optional: material overrides (default: only
G4_AIRfor volume outside of external)optional: spatial resolution overrides (default: same as TPS dose)
optional: which beams to simulate (default: all of them)
GATE-RTion Simulation runs on the cluster (typically for a couple of hours, the actual runtime depends on many factors)
Beam dose distributions are exported by IDEAL as DICOM files (and MHD format, if configured that way)
User analyzes and evaluates dose distributions using third party tools (e.g. [VeriSoft] or a TPS like [RayStation])
For a user in a light ion beam therapy clinic, this workflow is illustrated in figure below.
Longer term work flow
You work in an proton/ion beam therapy clinic and decide that Geant4-based independent dose calculations may be useful in your clinic.
A sufficiently powerful and extendible computer cluster is acquired, with resources as described in System requirements.
IDEAL is installed on this cluster as described in IDEAL installation by an employee with an admin role.
The medical physicist(s) with a “commissioning” role develops the beam model(s), installs the CT Hounsfield lookup tables and edits the system configuration file with correct values.
The medical physics team runs a series of tests to make sure that the installation went well. This should probably include:
Integrated depth dose curves for several energies in water (using a CT of a water phantom)
compare with measurements (both the shape of the curve and the absolute dose)
determine/adjust correction factors
Beam profiles in air, compare with measurements
Example treatment plans from recent clinical practice:
Check level of agreement, find any systematic offsets in dose or in geometry
Determine cluster performance:
how does the simulation runtime vary with statistical goals and with complexity of the plan (number of beams, number of spots, radiation type, etc)
are there any crashes (e.g. due to insufficient memory)?
Check all combinations of beamline, radiation type, passive elements and CT protocol that you expect to use
You are yourself responsible for the correct use of IDEAL and any consequences of using its results. If you intend to use IDEAL clinically, then you need follow all procedures for using “Software Of Unknown Provenance” (SOUP). IDEAL is NOT a medically certified product.
Use IDEAL to perform independent dose calculations in your clinic or for research.
The commissioning physicist should make sure that the commissioning data are correct and up to date. Whenever new beamlines or CT protocols are introduced or the existing ones are changing, the commissioning data should be updated.
The admin should make sure that the disks do not fill up, by regularly purging data from older simulations.
Periodically review the performance of your IDEAL installation:
with experience you may improve some choices made during installation and commissioning
buy more cluster nodes, more RAM (and update the System configuration file)
share your observations, experiences and ideas for improvement with the IDEAL development team
Command line interface
Command line interface: clidc.py
The name clidc stands for: Command Line interface for Independent Dose Calculation with “IDEAL”.
The command is run in a bash shell environment (or equivalent, a Z-shell probably also works).
In order to set up the environment to make it work, the user should first run
source /path/to/IDEAL/install/bin/IDEAL_env.sh, where /path/to/IDEAL/install
should obviously be replaced with the actual directory path where IDEAL
was installed [2].
Ways to call this script:
Get help, remind yourself of all the possible options:
clidc.py --helpQuery which hardware is supported (by the commissioning physicist) in the current installation:
# print the list of supported CT protocols, modelled phantoms, override materials and beamline names.
clidc.py -C -P -M -Z
Query a plan:
# query a specific treatment plan, to print to stdout:
# * list all ROIs in (the structure set used by) a plan
# * the default size (number of voxels) of the dose distribution
# * the list of beam names in the plan
clidc.py -R -X -B /path/to/some/RP_treatment_plan.dcm
Configure & submit a plan for independent dose calculation:
# you need to provide at least one statistics goal and a treatment plan filepath
# you need to provide EITHER a CT protocol OR a phantom name
# tweaks are optional
clidc.py -l user_role \
     [statistics options] \
     [ -c CT_protocol | -p phantom ] \
     [ configure tweaks ] \
     /path/to/some/RP_treatment_plan.dcm
So there are basically four groups of options:
- General options (
lvsjd) These options can be combined with any of the other options.
-l: “login” or “username and role”. This option specifies the username and role under which you would like to runclidc.py. The username and role is part of the output dose files. Some configuration options can only be used withcommissioningrole (e.g. make the beamline model than the default model for theTreatmentMachine). The default value for-lis the Linux user name under which theclidc.pyscript is run. User names are roles are configured in the System configuration file.-v: This option causes thedebuglevel output of the query or job submission to be printed to standard output. Default is to print only theinfolevel (which is already quite verbose). The verbose logging output can always be read in the log file that is written for every invocation ofclidc.pyin the logging directory.-s: With this option you can runclidc.pywith an alternative system configuration file. This can be useful for commissioning/research. Default system configuration file is thecfg/system.cfgfile in the directory where IDEAL is installed.-j: Number of cores to use per beam. Default: the number of cores specified in the System configuration file.-d: This option is currently a no-op. The intention is that when set, the temporary data generated by the simulations will not be compressed/deleted, so that it remains available for diagnostics and debugging by the user/developer/researcher. Currently, the temporary data are always compressed, unless the postprocessing script crashes before it gets to perform that operation.
- Query options (with a uppercase letter:
BCMPRXZ) These cause
clidc.pyto perform a query instead of a dose calculation. These options cannot be combined with the following two groups of options (configuration tweaks and statistics goals).-B: beam names in a treatment plan-C: available CT protocols (Hounsfield lookup tables)-M: available override materials-P: available phantom models-R: ROIs in (the structure set that is used by) a treatment plan-X: default dose resolution (number of voxels in each direction)-Z: available beamline models (useful for commissioning and research)
- Statistical goal options (with a lowercase letter:
tnu) These cause
clidc.pyto perform a dose calculation and cannot be combined with query options.-t: maximum time to run (excluding queue waiting, pre- and post-processing time) in minutes.-n: minimum number of primary particles to simulate.-u: average uncertainty to reach (or better) in the voxels that have at least half the maximum dose.
More details below.
- Configuration options (with a lowercase letter:
bcmpxz) These options change the way how
clidc.pyto perform a dose calculation and cannot be combined with query options. Note that for each uppercase query optionBCMPXZthat queries a quantity/property there is a corresponding lowercase configuration optionbcmpxzthat changes the value/setting of that quantity/property. (The information queried withRis used in themmaterial override option, so there is not separatertweak option.)-b: beam names to simulate (instead of all beams in the treatment plan)-c: CT protocols (Hounsfield lookup tables) to use-m: followed by one or more values of the formROINAME:MATERIALNAME, to specify material overrides.-p: specify phantom to use INSTEAD of the CT-x: changes the dose resolution (number of voxels in each direction; the origin and physical size remain unchanged).-f: score dose on full CT resolution, do not resample to the TPS planning dose-z: use this beamline model for all beams in the plan (only available with commissioning and research roles)
The
-cand-pare mutually exclusive, as are-xand-f.
Examples of all 7 possible combinations of the three statistical constraints/goals:
-n 1000000: stop when >1000000 primaries were simulated.
-u 1.5: stop when average statistical uncertainty in the high dose region is <1.5%.
-t 18000: stop after running for >5 hours.
-n 1000000 -u 5: run >1000000 primaries, and then continue running until <5% uncertainty is reached.
-t 18000 -u 4: try to reach <4% uncertainty, but stop if it takes >5 hours.
-t 18000 -n 1000000: try to simulate >1000000 primaries, but stop if it takes longer than 5 hours.
-t 18000 -n 1000000 -u 2.0: stop after 5 hours, unless the goals of running >1000000 primaries AND <2% average statistical accuracy have been reached earlier.
The constraints are not checked after every individually simulated primary. Rather, they are checked periodically (e.g. every two minutes, this can be configured). This means that the constraints will typically be exceeded by a bit: you may get a couple of thousand primaries more than you asked for, the simulation may keep running for a while after the timeout has expired and/or the average statistical uncertainty may be slightly better than the goal.
Todo
Describe better how the average dose uncertainty is computed. There is some explanation buried in the system configuration file docs, but that is in the install/commissioning part. It should actually be explained in the “usage” part of the manual.
API interface
API interface: api.py
From version v1.1, IDEAL supports an API interface. The API is launched by running the bin/api.py file on the submission nodes and can be contacted by any client that has access to the server where IDEAL is running.
The IP address of server and client can be configured from the cfg/api.cfg file.
The API was implemented to run on HTTPS protocol, which means that a SSL certificate (self-signed certificates would work just fine) should be created. The user can refer to the following links to have an understanding of how SSL certificates work (https://blog.miguelgrinberg.com/post/running-your-flask-application-over-https) and how to generate and store them ( http://gagravarr.org/writing/openssl-certs/others.shtml#selfsigned-openssl).
Alternatively, the user can run the API on HTTP protocol, simply removing the ssl_context argument from the app.run() function in bin/api.py.
The API requires to store users credantials in a SQLite database (.db file extension). Credentials should include:
username (as defined in the sysconfig.cfg file)
user first name
user last name
user role (as defined in the sysconfig.cfg file)
password
The database path is stored in the cfg/api.cfg file. To create the database, the user could refer to the example script bin/create_db_api.py.
To properly function, the API is supported by a background program, which keeps track of all simulations’ stati and sends the results back to the client when the simulation has completed. The program requires that the cfg/log_daemon.cfg file is set up, as described in the ‘Commissioning’ section.
After launching the API, the user has to launch this background program, by running from the terminal:
cd <IDEAL directory>
source bin/IDEAL_env.sh
python bin/log_daemon.py
Wheather the results are authomatically sent back or not, can be controlled from the api.cfg file.
The API currently features the following endpoints:
Authentication:
URL: /v1/auth
type of request: POST
parameters:
account-login
account-pwd
IDEAL version:
URL: /v1/version
type of request: GET
Submitting a job to IDEAL:
URL: /v1/jobs
type of request: POST
NOTE: the configChecksum entry refers to the sha1 checksum of the commissioning directory and of the system.cfg file. The checksum parameter was introduced to verify that the simulation settings are not changed after the system freeze. To calculate it, the user can run:
import ideal.utils.api_utils as ap
data_checksum = ap.sha1_directory_checksum(<commissioning_dir>,<sysconfig_path>)
request body example:
{
         "dicomRtPlan": "string",
         "dicomStructureSet": "string",
         "dicomCTs": "string",
         "dicomRDose": "string",
         "uncertainty": 2.5,
         "username": "string",
         "configChecksum": "string"
}
Get overview of jobs in the queue:
URL: /v1/jobs
type of request: GET
example returned value:
{
         jobId_1: "running",
         jobId_2: "waiting"
}
Retrive results for a specific job:
URL: /v1/jobs/{jobId}
type of request: GET
parameters:
jobId: ID of the job (available from overview). To be set in the path of the request.
Cancel a specific job:
URL: /v1/jobs/{jobId}
type of request: DELETE
parameters:
jobId: ID of the job (available from overview). To be set in the path of the request.
cancellationType: "soft" or "hard". To be set in the query. Whether the cancellation should try to return temporary results (soft) or nothing at all (hard).
Get the status of a specific job:
URL: /v1/jobs/{jobId}/status
type of request: GET
parameters:
jobId: ID of the job (available from overview). To be set in the path of the request.
The client API’s implementation is left up to the user. However, an example client API can be found in receiver_test.py, in the IDEAL directory.
Once the API is up and running, the user can contact it via a client of his/her choice. In bin_example_api.py, the user can find an example of how to start jobs through the API via a python script.
Python module interface
Python module interface: ideal_module.py
IDEAL has been written in a modular way, such that its functionality is available to research users via python modules.
The bin/ideal_module.py exposes most of the IDEAL main functionalities and allows the user to easily start simulations via python scripting and retrieve info on the dicom data.
A user example can be found in bin/main_ct.py.
Requirements and limitations on DICOM input
What kind of treatment plans can be studied using IDEAL?
The input treatment plan should be a plan for scanning ion beam treatment. IDEAL is not designed to work for e.g. passive scattering proton therapy and conventional radiation therapy with photons.
IDEAL takes the DICOM plan file as input, and expects to find the following DICOM files in the same directory (or in subfolders): * Structure set file, with the
SOP Instance UIDthat is referred to by the treatment plan, * CT files, with theSeries Instance UIDthat is referred to by structure set, * TPS dose file(s), which refer to theSOP Instance UIDof the treatment plan.Hounsfield lookup tables for the protocol that was used for the input CT should be available under CT protocol Hounsfield Lookup tables in the Commissioning Data Directory.
Beam line model for the ‘Treatment Machine’ should be made available under Beam line modelling in the Commissioning Data Directory.
In case multiple TPS dose files are found (physical and/or effective dose, dose per beam and/or dose for the whole beamset) it is important that all have the same geometry (origin coordinates, voxel size a.k.a. “spacing”, number of voxels in each dimension a.k.a. “image size”).
Full details of how IDEAL uses DICOM can be found in the DICOM specification.
PyQt interface
More details.
Research interface
More details.